ThinkStation™ P Series Diagnostics - P5, P620, P7, P8, PX
ThinkStations desktop workstations are designed with built-in hardware based
monitoring. This hardware monitors hundreds of aspects of your
workstation, notifying you in real-time of hardware related
events. There are several ways to access this information including desktop software, mobile applications and USB.
If you already have a diagnostic code, you can quickly look it up here.
Diagnostic Monitoring Software - ThinkStation Diagnostics - P5, P620, P7, P8, PX
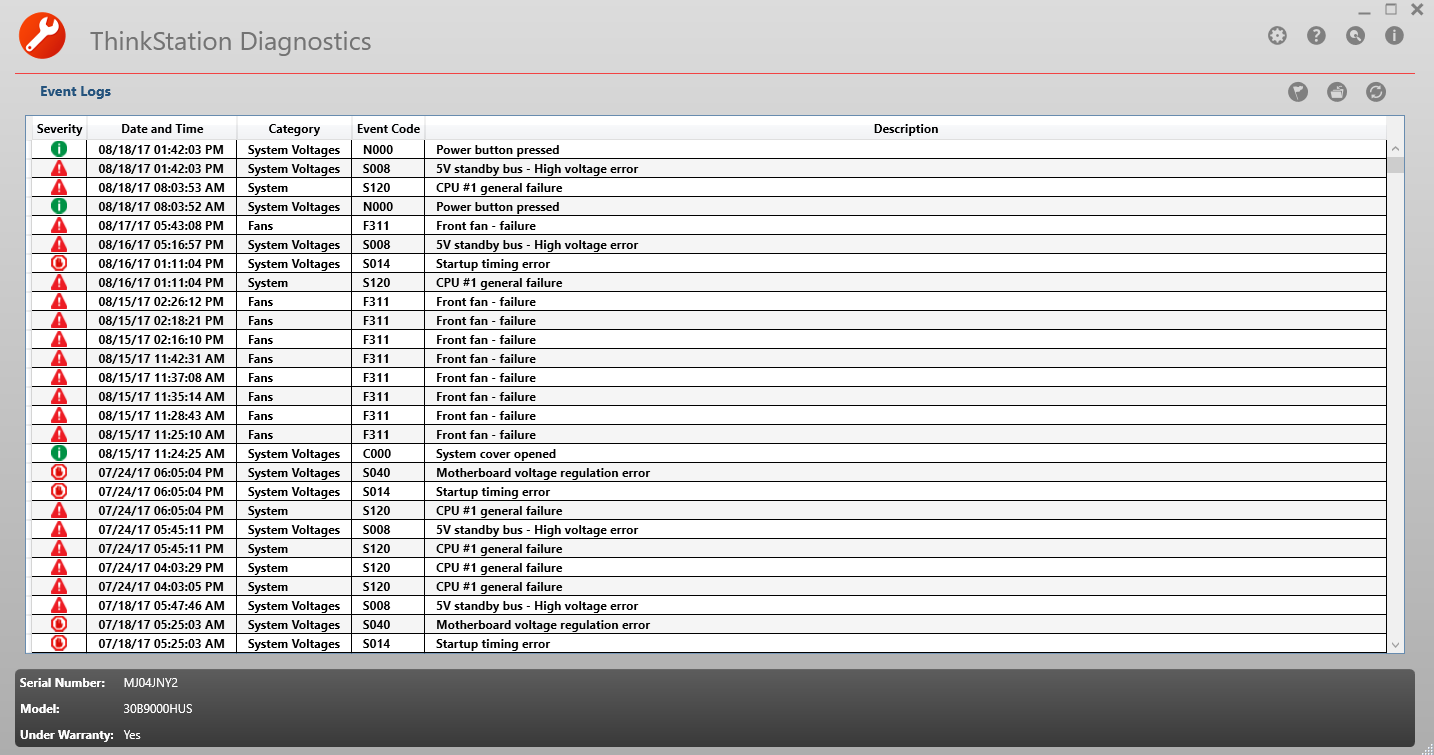
ThinkStation Diagnostics is a Windows based application that
provides real time notification of hardware events on your desktop.
Any error events that occur are displayed immediately as a
notification in the system tray. All other events are logged locally
and can be viewed in the application.
ThinkStation Diagnostics is compatible with all systems shipped
after July 2017 (P5, P620, P7, P8, and PX models). You can install
it from
here.
Compatibility
Supported on Windows 7, 10 and 11 64 bit.
Note:
Older systems may have Lenovo Solution Center(LSC) pre-installed. This has the same hardware monitoring capabilities as
ThinkStation Diagnostics. An update of Solution Center will have
removed this monitoring. ThinkStation Diagnostics is the recommended desktop
monitoring software now.
Mobile Applications - P920, P720, P620, P520
The P920 and P720 systems can be accessed with Lenovo PC Diagnostics. This is only
necessary or useful when the system has reported an error that the
monitoring software did not handle due to the severity of the error,
or if the monitoring software is not installed. In these cases, the diagnostic
error indicator will light up on the front panel of the system. For
the P920, this is an LED panel that displays the error code. For the
P720 it is an orange error indicator light. Any time these panels are
lit, you can use Lenovo PC Diagnostics to retrieve the error
information. This is particularly useful in the event the system will
not boot.
Lenovo PC Diagnostics is available for Android and iOS.
Google PlayStore - Android 4.2 (JellyBean) and higher.
iTunes App Store for iOS - iOS 9 and above. iPhone 6 and
above. iPad not supported (application requires a camera flash to
operate)
For users in the PRC (People's Republic of China) please use this link for the Android version.
Mobile Application - P910, P900, P710, P700, P510, P500
For these systems we have Lenovo
Workstation Diagnostics. Just like PC Diagnostics, if an error is
displayed on the front panel, this application can be used to retrieve
it. On these systems, the front panel also has a diagnostic USB port.
This port is illustrated with a wrench icon, and will begin blinking
if there is an error. The error indicator light or LED panel must be
lit up for this to work.
In this case, with your Android smartphone with Lenovo
Workstation Diagnostics installed, simply connected a USB cable from
the diagnostic USB port to your phone. Leave the phone connected
until the you get a notification on your phone that the log was
received. You can then click on the notification, or launch the app
to view the event log.
Google PlayStore - Android 4.2 (JellyBean) and higher.
Other Options - P500, P510, P700, P710, P900, P910
USB Thumb Drive
You can
retrieve diagnostic data with a FAT32-formatted USB key. The
diagnostics will only write to the USB Key when the system is in an
error condition. This will be noted by the front panel LEDs, as
follows:
- On P500, P510, P700, P710: Orange diagnostic indicator
will be on (solid or blinking), AND the diagnostics USB port LED
begins flashing
- On P900, P910: Error code is displayed on the
4-digit panel, AND the diagnostics USB port LED begins flashing
Data will only be written to the USB key if it is inserted
after the diagnostics port LED begins to flash. Once the USB
key is inserted, the following should occur:
- On P500, P510, P700, P710: Orange diagnostic indicator
will flash quickly for 5-15 seconds, the remain solid to indicate the
transfer is finished
- On P900, P910: The words “File Copy” will
appear on the 4-digit display for 5-15 seconds, followed by
“File Copy Done” to indicate the transfer is finished
Once the diagnostics write is complete, take the USB key to a working
computer and upload the DIAG0000.TDF file that was written to http://support.lenovo.com/workstation_diagnostics
to have it decoded.
Manual Lookup - P900, P910, P920, P720(optional), P620(optional), P520(optional), P410(optional)
The P9xx series of workstations all have a 4 digit LED panel that
displays an error code if there is one. This is optional on the P620, P520, P410 and P720 models. You can use our diagnostic code lookup to determine the
problem.